photo 5fa4f53c-9555-45d1-809b-3e537846bb4e.jpg
Showing posts with label Tutorials. Show all posts

Saturday, April 16, 2011

Land of Nod Knockoff Wall Book Bin

I know that many of us out there love Pottery Barn,
and we also love Restoration Hardware, 
and I am sure that we love Crate and Barrel.

Well, I absolutely adore Crate and Barrel's kids stare
Even the name is cute.

Their prices are fairly reasonable,
depending on what you are looking for of course.

For instance these shelves right here aren't too hefty a price.


They are $49

However . . . 
I made a knock off for a grand total of 
$9

This is a serious savings!!!

So what did I do?

First I found this at the thrift store.


It is a Norman Rockwell plate rack.

It cost $2.25.
Woot! Woot!

Okay, then I ran to Home Depot and picked me up some white spray paint.

I was ready to ROCK!!!!

Here we go . . . 

First, I removed this lovely gold placard.
No longer necessary.


Then I grabbed some 300 grit sand paper that the hubs had in the garage.
There were some spots I had to smooth out. 
I also sanded lightly over the entire shelf.

Once that was all nicely done,
I got down to business and started spraying.


I think I did about 6 or 7 very light coats.

Next comes the molding. 
This molding was .59 per foot.

The hubs cut it and nailed it on, and then he did the touch up painting.

Next he hung it up.


Looking good, right?

Well, there was just the small matter of those little spots
in the middle where the metal placards had been.

I knew I wanted to put a quote there.
Then I remembered that for my MA Graduation invitations
my friend Jenna had found a great quote about literature from
my favorite author DH Lawrence.

If you are familiar with Lawrence's work you may be thinking,
"She put something HE said in a babies room?!?!?"

It's not inappropriate. PROMISE.
It says:
Oh literature, oh the glorious Art, how it preys upon the marrow in our bones.
It scoops the stuffing out of us, and chucks us aside. Alas!


See. Not bad.
I like how it demonstrates the deep emotional connection that can be made to books.

I printed each sentence on cardstock and cut them down to the appropriate measurement.
5x3/4 inch


Then, after like three weeks of distractions, I Mod Podged them onto the book bin.

I had some trouble getting them to be completely smooth.
Any tips for next time?

VOILA!!!
(Yes, I say this at the end of most projects. Why not?)
Some of the books are different because it took so long to finish up this project.


Then I added those final decorative touches you see on top of the book bin.

First, these blocks.
 I picked them up at a local antique store.
They were $1 for the small ones and $2 for the large one.


I know that isn't exactly cheap,
but I only wanted these 5.
Also, I didn't feel like scouring the thrift shops for wood blocks.

I love the way they turned out.

Next, I placed one of our favorite books atop.
I Love You Through and Through


Have you read this one?
If you haven't, I promise it is cute and fun to read with the kiddos.


There you have it.

All done.

What do you think?
What thrifty transformations have you been working on?


*** I have entered this item in Seven Thirty-Threes Knock It Off Contest****
Specially linked to:
Visit thecsiproject.com


Wednesday, April 13, 2011

Duvet Cover Turned Curtain Panels

THIS POST HAS BEEN PREVIOUSLY POSTED AT AGAPE LOVE DESIGNS.


We have lived in our house since July of 2004. 
That is almost 7 years.
There are gorgeous real wood blinds on our windows. 
They have made an appearance or two on my blog before.
However, there has NEVER been curtains
on the window in my Master Bedroom.

I just can't seem to decide what I want.
Well, forget it.
It doesn't have to be perfect.
I think searching for the "perfect" thing 
can often deter a person from doing anything.
Case in point.

So, I took my old duvet cover.
This one here with the blue birds.

It still matches my decor.

In fact it is quite similar with the exception of the cute blue birds,
which were what won my heart in the first place.

I mainly replaced it because it has REALLY slightly discolored.

Anywho. This is what that duvet cover looks like now.

Pretty cute, if I do say so myself.
I know it's a lot of pattern, 
but they will be open much of the time,
once I get some tie backs that is.

Oooooh, wait!
Don't they look great as a valance?
Let's see.

What do you think?
Does it work?

Well, let me show you how this process went.
It's pretty simple. I PROMISE ;)


First lay out your duvet cover so that it is flat. You will actually be surprised by how large it actually is.
Next, fold it in half the hot dog way (lengthwise)

Now you are ready to cut.
I am sure measuring would be good too,
but this method actually works quite well.

Now you will have two double dipped (double sided) panels
that are open on one side and the bottom.
The bottom is where the duvet was already open for insertion of the comforter.


Flip the cover inside out.

You may want to pin the edges together.
In my haphazardness, I did not.
This caused me to have to tear out the second panel and resew.
Tedious!!!
Do it right the first time, unlike me.


Next, I stitched up the open sides.
I left a small area open at the top for the rod to slip through.
(Sorry no photo of this step, but pretty self-explanatory)


Then I flipped it back right side out.
I opened some stitching on the side that was manufacture sewn
 for the rod to slip all the way through the top.

Finally I stitched all the way across the top to make the rod casing.

I turned under the edges of the casing and stitched those as well.

Trim the threads.

These puppies birdies are ready to hang.


And here they are one more time!


Friday, March 25, 2011

{Frugal Friday} Simple Monogram Frames & {Spring Fling} Day 6

I am in the midst of creating some photo gallery walls in our home.

One such wall is in our bedroom and will have my
in addition to this project.

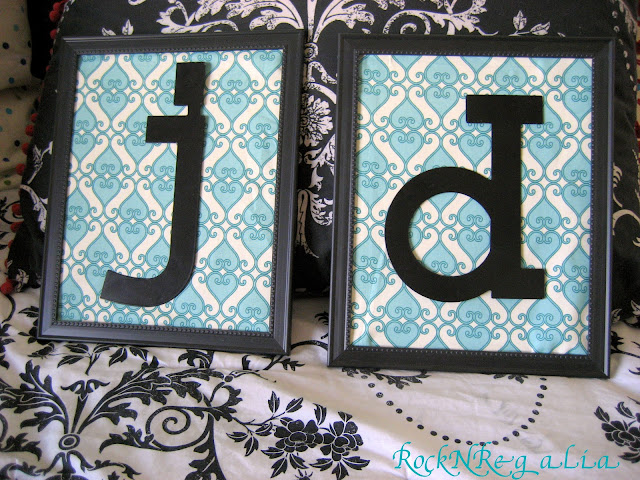
These are a set of matted and framed monogram initials.

This was crazy simple (and cheap) to make.

I picked up the letters at Michael's just after Halloween for .29.
I wasn't sure what I wanted to do with them at the time,
I just knew that I couldn't pass up the price.

Then I realized that I wanted to frame them.
So, I picked up two black 8x10s at Dollar Tree.

Total cost is up to $2.58 pre-tax.

Once I realized that the fabric I used on the heart for my Valentine's garland
(seen here and hereguest post coming soon, then link will be enabled)
coordinated with my room decor,
I jsut knew that it would make the perfect matting.

We are still at $2.58.

So here are the simple steps to putting it together.

1. Remove the glass from the frames so that the metal letters can fit. 
Also, remove the stand thingy from the back.


2. Cut the fabric to fit the frame, iron it smooth, and glue to backing using hot glue gun.

3. Adhere the letters using hot glue gun or Gorilla Glue.

When I was doing this I realized that my "d" was actually a "p" because of where the hangers were.
No biggee though.

4. Return to frame.

TA DA!!!
This is currently Monster's favorite saying when he does something.


Like many of my projects, that was completely painless.
You are now ready to hang your creation.

Oh yeah, and did you notice that there were no more additional costs
because all other items were on hand.

Yippee!!!
$2.58


Speaking of frugal endeavors.
Getting great items for free is ALWAYS a frugal choice.
So don't forget to check out today's Spring Fling Giveaways
from the og so special event hosted by

Todays giveaways include:

A Cleaning Apron and a Box of Magic Erasers from Nat Mac


and an AWESOME headband from one of my favorites Luxe Boulevard


I might have to ask you to not enter this one so that I can have a better chance of winning.
WINK!WINK!
Sorry, I am just partial to ALL things nautical.


Have a great weekend and remember to be frugal.

Monday, March 21, 2011

Sweater Nest Spring Wreath

I am so proud of myself for being ready for the season to change,
as in my decor is up and Spring has just begun.
Yes, I am patting myself on the back.

Today I am going to share with you the first of my Spring projects.

Here is my Spring wreath; 
I thought it should be called 
The Sweater Nest Wreath
photo taken by Monster. He's getting some pretty good style for being 2 1/2.

This project did take about an hour in total from start to finish,
but it was a nice day so the boys played in the yard
and I created with intermittent pauses.


Supplies:
  • old sweater
  • wreath form ($1 at dollar tree)
  • sheers
  • glue gun/sticks
Last Minute Additions:
  • paper bag
  • twine
Steps:

Get out your old sweater
preferably one with holes

Now you are going to cut the sweater into the pieces.
I separated the lace collar to keep for a different project.


Then I cut off the sleeves and ribbed waistband to keep for a pair of baby sweateralls.


I love that this Volcom emblem will remain on that project.


I then cut the rest of the body into two halves 


and then into strips. 

I did end up cutting a bit of strips from the top of the sleeves 
because I know that I won't need them to be as long
 for the next project.

I also salvaged the bright pink Volvom Stone from the bodice.
I might use it for a flower center or something someday.


Now it is time to start the real work.

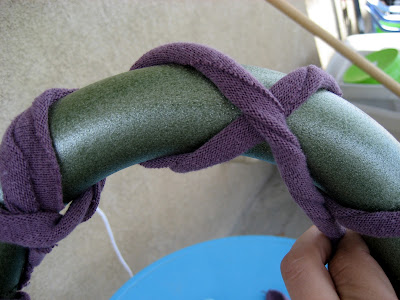
Grabbing your first strip, adhere it to the wreath form 
using your hot glue gun.


Then twist the strip like so.

It adds some dimension and texture.

Begin wrapping the strip around the wreath form, gluing when you get to the end of the strip.

Add the next strip where the first one ended.


Continue this process until you return to the 
beginning of the first strip.
It should look something like this.

You are now ready to begin the next row of twists.
Glue your next strip a gap between the existing twists.
Remember to try to keep all of your glue spots on the same side of the wreath form.

Going in the opposite direction of the first twists, follow the same directions as before.

You should have something resembling this.


Again continue until you reach the end of the first strip in this direction.

Now, you will begin to add strips into the empty space.
Twisting and adhering in the same manner.
It is now a sort of figure it out as you go process.
Just remember that as long as you fill in all the empty spaces,
then you've done it correctly.

Here's a shot of me "figuring it out" courtesy of Monster who loves to steal my camera.
Good thing I just have an old point and shoot.
I know you want the ensemble details, right?
Shoes: Juicy Couture, Yoga Pants: Victoria's Secret PINK, Thermal: DL's drawer, maybe Hanes.

Okay, so now that I have amused you with my High Desert Ghettoness, let's get back to business.

After all of your spaces are filled in, leaving two extra strips out, it should look beautiful like this.


Now it is time to get out the twine.
I was lucky to already have twine on hand because it was a last minute addition to the project plan.

Cut a circle out of some excess fabric and spiral glue the twine onto it.
This is the base of your wreaths rosette.

Next take one of your strips,and using another scrap circle,
create the rosette.
Remember to twist as you got to keep the style.

Finally glue your sweater rosette to the twine circle rosette.
Then adhere it to the wreath.

See, it is looking good and rustic.
Very nest like.

There are just a few small steps left.

I decided I wanted something to hang it by so I took my other extra strip
 and some twine of equal length and twisted them together like so.


Then I glued this to the back of the wreath in order to make a hanging loop.

After this I decided there was still something missing.
I want a saying to go with the nest like theme.

So I took a brown paper grocery bag and ripped it to fit in my printer,
no scissors necessary.
Then I opened up word super quick, found a font, and typed,
"Welcome to our nest."

Once it was printed I tore the paper down to the size I needed.
I went back to my wreath and hung it on the twine that was already hanging into the center 
using just s dot of hot glue.
Then I tore two small piece of the bag and added them for extra strength.

ALL DONE!!!!!


HANG AND ENJOY!!!!!!!!!!!!!


Don't forget to go and enter today's Spring Fling Giveaway contests co-ordinted by Wildflowers and Whimsy