photo 5fa4f53c-9555-45d1-809b-3e537846bb4e.jpg

Tuesday, October 4, 2011

How Does One Hide a Six Foot Tall Spiderman?

How Does One Hide a Six Foot Tall Spiderman?

Yes. I know that this is a question that you have been pondering for months.
It is the burning thought in the back of your mind that causes you to lose sleep at night.

Well, it truly was for me a little over a year ago.

I mean really,
how was I going to cover THIS up?

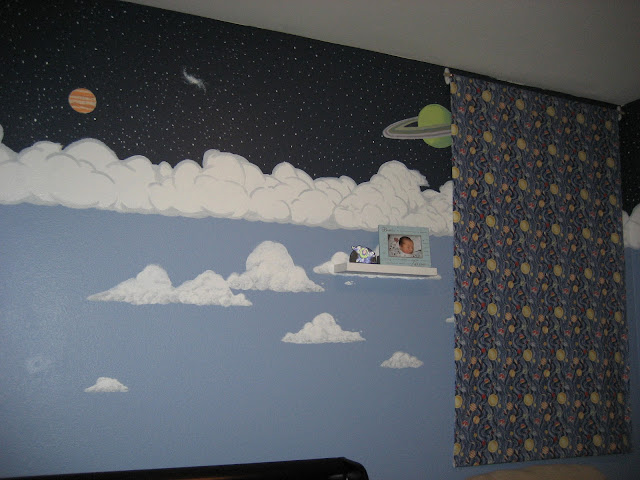
It does not belong in a space themed room.
You may think that full coordination is not necessary, 
but I wanted a nursery that did not include spidey.

Of course the Cuban Cowboy was not
going to paint over his hard work.


He did concede to painting over the webbing.
He said that it would be easy to do again.
ACH! The dilemma still remained for the rest though.

I thought for months, about nine of them to be exact, on how to remedy this situation.
After several ideas we decided that we were going to make a felt/flannel board tapestry.

It was super duper easy.
In fact I sewed it up only a few days before Roly Poly made his grand arrival.

I didn't get around to cutting out the letters for his name or the shapes until later, 
but that didn't take much time either.

It was also inexpensive.
I am sure I will continue to make new shapes here and there.

The "tapestry" is hanging on a wooden dowel 
via a tunnel I made for it, 
and then there are some command hooks attached 
to the wall that the dowel rests on.

There is a second dowel in a little tunnel 
at the bottom to keep it weighed down.

See. Simple.
And yes, that is how one hides a ridiculously large, but cool, 
Spiderman.


Monday, October 3, 2011

{Boy Spaces} Where The Wild Things Are

Welcome! Welcome! 

Today we begin a wonderful little series all about boy spaces.

The calendar for the week looks like this: 
Sunday: Project Teaser
Monday: Where The Wild Things Are
Tuesday: In a Galaxy Far, Far Away
Wednesday: Boy Spaces Other Places
Thursday: Guest Post
Friday: Just Keep Swimming
Saturday: Pinspiration
Sunday: Week in Review & Winner Announced

So, that means today is Where The Wild Things Are

This Boy Space belongs to my older son, Monster

We put a fair amount of work into this room,
really The Cuban Cowboy did.

Let me just show you some full view shots first 
and then we can look at some of the details.

Large leag: Ikea
Decoupoaged name letters were done by me.


Solid Oak Captains Bed: Custom made when I graduated high school


Kids need lots of bins for their toys.
I really want to recover the 
Love Sac to match the rest of the room.
It makes a great reading area.

Green shelf: Ikea and then painted to match the room.
Rocking horse thrifted and refinished by Tia Maite and Tio Jess. 

Wall pegs: Michael's and then painted to match the room.

Wild Things Murals/Paintings:


After painting the first two pieces on the wall 
the Cuban Cowboy decided that the rest should be on canvas, 
so that his hard work would not have to be destroyed someday.


Mini Gallery Wall:


The hubs is a comic book fan, 
so when we decided on the theme he ran out and purchase 
the Hulk comic book with the Wild Things themed cover. 
We then went to Michael's and had it framed and matted.

I love the photo of Monster and Daddy painting 
one of his Wild Things pieces together.


I hope that you enjoyed seeing the first official 
Boy Space of the week. 
Stay tuned for some more fun stuff.


Sunday, October 2, 2011

Easiest Knockoff EVER!!!!!!!!!! A Boy Spaces Teaser

Tomorrow officially kicks off our Boy Spaces event.


However, this evening I have a little teaser for you.

It is the most recent, and simplest, 
project that I have added to Roly Poly's bedroom.


I am a Land of Nod gal through and through,
so when I saw these cute and simple 
not only did I fall in love with them, 
but I also knew that I was going to make my own.

I had already purchased some knobs from ETSY
 while I was prego with Roly Poly,
which means about 1 1/2 years ago.

I had never done anything with them because 
I just didn't know what I wanted to do.
I loved that they matched his Dwell bedding,
but beyond that I had nothing.

So this was finally the project that could put them to use.

It took about 5 minutes from start to finish.

SUPPLIES:

  • nails
  • knobs
  • Super Glue
  • string
  • mini clothes pins
  • photos and other stuff of your choice


What to do:

First I nailed the four nails spaced apart at various heights 
and distances so that the string could be run between them.

Next I took the super glue and I filled the hole of one knob. 
I then placed the knob over one of the nails and held firmly for about 30-45 seconds.

***Make sure that your nails are pulled full enough out 
that there is space between the back of the know and the wall.***

This step is repeated for each knob.

The next step is to tie the string onto the first knob 
and then continue to wrap it around each knob
 so that it goes back and forth in a zig zag pattern.

You are now ready to hang your photos and memorabilia.

I added some Creative Memories title stickers 
and a rocket sticker backed on 
white card stock and then cut out.
I love that I can change this as I get new photos 
and other important memorabilia.

I hope that this first project revs you up 
and gets you into a creative mood.

If you are a knob collector like Ashley from Little Miss Momma,
you could use this in any and every room.
You can read about her knob obsession here.

I am looking forward to this week.

Are you ready to ROCK some Boy Spaces?

Friday, September 30, 2011

Boy Spaces--An All Boy Event

Here ye! Here ye!
Yeah, I am the town blog crier today,
and I am here to announce a little series 
that will be coming up next week.

It is called 

BOY SPACES.

This series will focus on all rooms boy.
As a mom of two boys this is something that is constantly on my decorating and crafting brain.
So, I thought that I would share with you 
my boy areas all in one shot.

Throughout the week I will also feature some other great spaces that are out there in blogland.

If you would like to be a part of the feature post you can link up your boy space photos to the
 Flickr page that I have created.

If you are a fan of Boy Spaces, 
or you are looking for some inspiration, 
grab a button and get ready to follow along.


Button


{Frugal Friday} A Piratey Christmas

Yesterday my friend sent me a link on Facebook for AThriftyMom.com
The link was regarding a 2 pack of pirate costumes for $1.98.

I was pretty excited. I headed over to the blog, 
then I followed the link to Little Tikes.
Actually, I had some trouble with the link 
so I just went to LittleTikes.com and searched Pirate Costume.

There they were.

A two pack like this is $1.98.

A single costume is .99.

I bought three two-packs.

I paid $14.96 out the door after shipping.

I bought so many because the shipping is flat rate.

I am pleased to say that there are some boys who will be receiving 
Pirate costumes this year for Christmas.

Very sweet deal!

Go check it out. 
Maybe there are still some left.

Happy Friday!!!!
I am so excited for it to be the weekend.


Monday, September 26, 2011

Stolen Book Shower

Over the weekend I hosted a cute little shower at my house.
It was nice and intimate. 


My friend is planning on cloth diapering,
so instead of doing a diaper raffle 
we decided to do a book raffle; 
you know bring a book for the baby 
and get a ticket for the raffle.

The idea for this shower originated from 
I did use her invitations.
They were easily customized.

I also adopted some of the decor ideas as best I could,
like using Golden Books for table decor 
and candies in jars.


Some of the other fun ideas that we used 
for the shower were also stolen 
from some of my favorite places in Blogland,
as well as some cool stuff from Pinterest.

For the favors, which also served as our only other prize game,
we created these cute gumball necklaces using 
the tutorial from Jamie Lynn 


We kept them in this little jar on the table 
until each lady was able to grab one. 


One of the necklaces had a pink gumball.
The person who grabbed that one got a prize.

I also created this Golden Book garland from something 
that I pinned on Pinterest.


It was easy to make, 
and it would look super cute over a reading area 
in a play room or kids bedroom.

For some extra touches I carried through 
the theme of yellow and blue 
by wrapping my thrifted serving tower in bright blue argyle paper,

laying down some yellow houndstooth fabric as a runner, 
and using lots of fun yellow candies and serve ware.


The cupcakes above were made combining this banana malted crunch recipe and this peanut butter butter cream recipe. 
Both are from InsideBruCrewLife.

I also made this center piece 
which was inspired by a different pin.


Overall the shower was fun and simple. 
I like having a less people because 
it allows for a less stressful party for everyone.


My helper, the mom to be, and Me sporting my very own gumball necklace.

For more cute ideas that I had lined up for this shower but didn't get to, you can visit my Shower board.


Friday, September 23, 2011

Scrapbooking

Did you know that I LOVELOVELOVE
to scrapbook?

I mean I am probably obsessed.

Okay, in addition to this I am pretty Creative Memories loyal.

People have their opinions for and against this,
but I will stay loyal.

For me there is just something about a life time warranty that kills the competition.

Furthermore,
I ADORE my consultant.

Seriously, she is more than my consultant, she is my friend.

After 8 years and about 20 albums
(Told you that I am obsessed)
I am still in love with this hobby.

For me it is the ultimate catharsis.

Do you scrapbook?
Do you have a favorite brand/product?
Are you traditional or digital?

What inspired all of the gushing of scrapbook love?

I AM GOING SCRAPBOOKING TONIGHT!!!!!!!!!!!!!!!!!!!!

No kiddos.
No chores.
No worries.

I hope that your weekend is off to an equally great start.