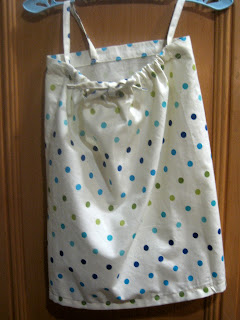
Here's the story:
You know those really cute bags that they now package sheets in. The ones that match the sheets. Well, I just couldn't bring myself to throw it away. The fabric was too cute, and in good condition. Brand new, in fact. So, I thought, that this little bag could be a great dress. If a pillow case can be a dress, why not the bag that it came in? Let's get to it then.
1. Take the bag out
2. Remove the draw string from inside the bag and set aside.


3. Turn the bag inside out and use the seam ripper to tear out the bottom seem. You will be pleasantly surprised to discover that though the bag looks flat bottomed, it is not. Instead it is one piece of fabric.

*****You should have this now*****
4. Return to the top edge that you removed the string from. On the opposite side from the opening you need to . . .
use your seam ripper and remove one or two stitches. Then take your shears and slice up the inside edge of the casing. You should now have an edge which matches the one from the original product.

5. Take that same top edge and find what will be your FRONT. Mark the center.
6. Use your rotary cutter to cut through both layers of the front center. This will be where the string will come out for a bow in the end.
7. Now it is time to get your iron. First, just do a general ironing of the bag. Then fold the bottom seam up about 1/4 inch. Iron it flat.
Then fold this a second time and iron flat again. You are now ready to . . .
8. SEW!!! Sew the seam at the 4/8. You are almost done. See I told you that this is simple.
9. Back to the ironing board. Get that string that you removed at the beginning. Iron it flat.
9. Fold it in half and cut it.
10. Now, you need to lay the dress shell flat, inside out. Use your measuring tape to measure four inches in from both outside edges on the back side. Then pin one strap piece at each point, cut edge to the inside.
11. SEW. You are going to sew back and forth about three or four times to securely adhere each strap.
12. Now back to the front. Remember that cut you made, find it. You need to make a stay stitch at the bottom of the cut. This will insure that no further fraying will occur when the dress is finished. It is also a good idea at this time to stitch in raw edges on the inside casing.
13. ****SORRY NOT PICTURED***
This step is easy though. All that you need to do is take each strap and pull it through the front casing until you meet the center cut that you made. Once both straps are through you are done (except for cutting all those loose threads that are left. I hate that part!).
VOILA!!!!!!!!!
There you go, from sheet bag to a dress of sweet dreams.
Isn't this the cutest little dress!!! I am so happy with the result. Darn I have two boys. I think that it makes about a size 12-18 months, but I am going to have to borrow my friends daughter to make sure.
HAPPY SEWING!!!!!


Awww, what an amazing first tutorial! You are off to a great start! I am in LOVE with this precious dress!
ReplyDeleteReally sweet, I will have to make one of these. Heaven knows I will have trouble picking from all of my fabrics.
ReplyDeleteThanks for the love ladies! I appreciate it, especially being so new.
ReplyDeleteToo cute! I use them as travel bags but love this idea too.
ReplyDeletetoo cute! great re-purpose!
ReplyDeletethanks for linking up!
gail