
I am so proud of myself for being ready for the season to change,
as in my decor is up and Spring has just begun.
Yes, I am patting myself on the back.
Today I am going to share with you the first of my Spring projects.
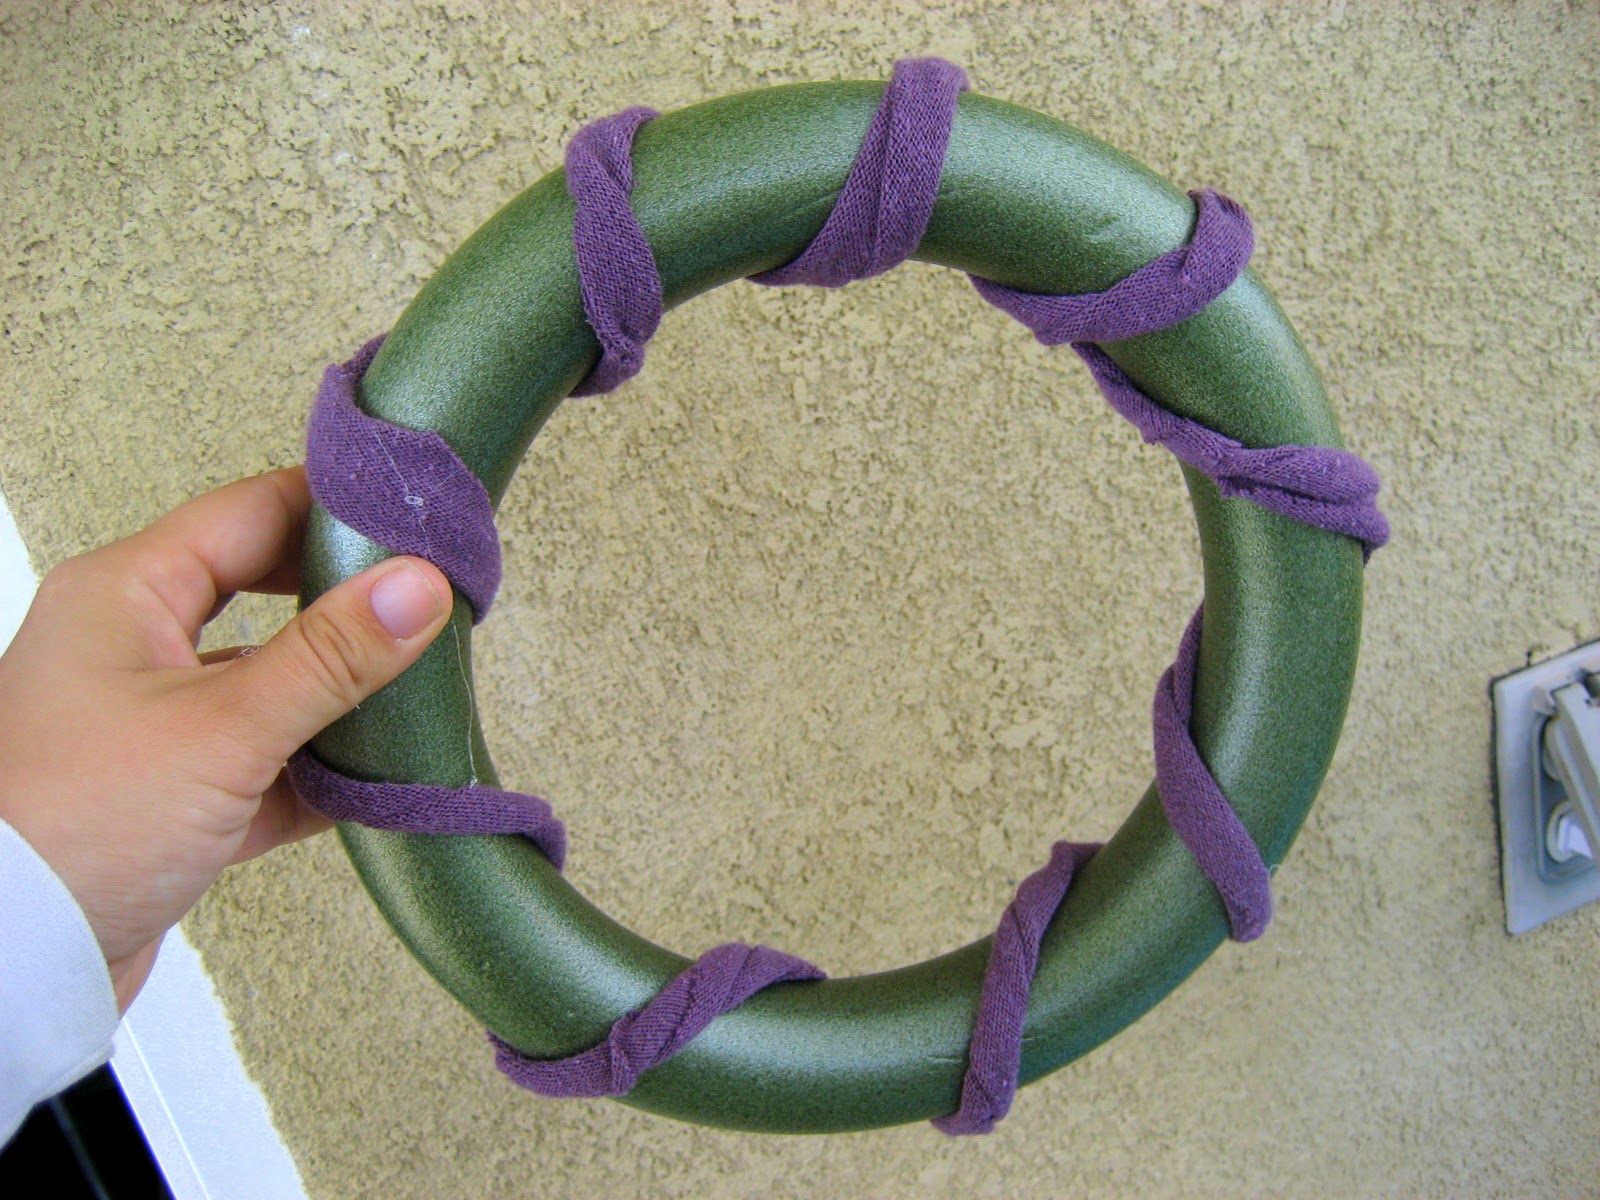
Here is my Spring wreath;
I thought it should be called
The Sweater Nest Wreath
The Sweater Nest Wreath
 |
| photo taken by Monster. He's getting some pretty good style for being 2 1/2. |
This project did take about an hour in total from start to finish,
but it was a nice day so the boys played in the yard
and I created with intermittent pauses.
Supplies:


Don't forget to go and enter today's Spring Fling Giveaway contests co-ordinted by Wildflowers and Whimsy
but it was a nice day so the boys played in the yard
and I created with intermittent pauses.
Supplies:

- old sweater
- wreath form ($1 at dollar tree)
- sheers
- glue gun/sticks
Last Minute Additions:
- paper bag
- twine
Steps:
Get out your old sweater

preferably one with holes

Now you are going to cut the sweater into the pieces.
I separated the lace collar to keep for a different project.


I love that this Volcom emblem will remain on that project.

I then cut the rest of the body into two halves

and then into strips.

I did end up cutting a bit of strips from the top of the sleeves
because I know that I won't need them to be as long
for the next project.
for the next project.
I also salvaged the bright pink Volvom Stone from the bodice.
I might use it for a flower center or something someday.

Now it is time to start the real work.
Grabbing your first strip, adhere it to the wreath form
using your hot glue gun.

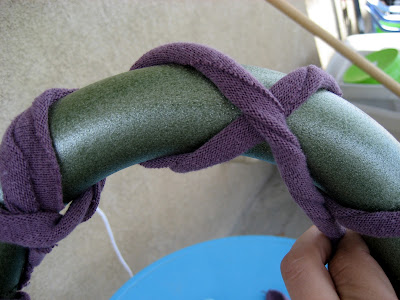
Then twist the strip like so.

It adds some dimension and texture.
Begin wrapping the strip around the wreath form, gluing when you get to the end of the strip.

Add the next strip where the first one ended.

Continue this process until you return to the
beginning of the first strip.
It should look something like this.
You are now ready to begin the next row of twists.
Glue your next strip a gap between the existing twists.
Remember to try to keep all of your glue spots on the same side of the wreath form.
Going in the opposite direction of the first twists, follow the same directions as before.
You should have something resembling this.

Again continue until you reach the end of the first strip in this direction.
Now, you will begin to add strips into the empty space.
Twisting and adhering in the same manner.
It is now a sort of figure it out as you go process.
Just remember that as long as you fill in all the empty spaces,
then you've done it correctly.
Here's a shot of me "figuring it out" courtesy of Monster who loves to steal my camera.
Good thing I just have an old point and shoot.

I know you want the ensemble details, right?
Shoes: Juicy Couture, Yoga Pants: Victoria's Secret PINK, Thermal: DL's drawer, maybe Hanes.
Okay, so now that I have amused you with my High Desert Ghettoness, let's get back to business.
After all of your spaces are filled in, leaving two extra strips out, it should look beautiful like this.

Now it is time to get out the twine.
I was lucky to already have twine on hand because it was a last minute addition to the project plan.
Cut a circle out of some excess fabric and spiral glue the twine onto it.
This is the base of your wreaths rosette.
Next take one of your strips,and using another scrap circle,
create the rosette.
Remember to twist as you got to keep the style.
Finally glue your sweater rosette to the twine circle rosette.
Then adhere it to the wreath.

See, it is looking good and rustic.
Very nest like.
There are just a few small steps left.
I decided I wanted something to hang it by so I took my other extra strip
and some twine of equal length and twisted them together like so.

Then I glued this to the back of the wreath in order to make a hanging loop.
After this I decided there was still something missing.
I want a saying to go with the nest like theme.
So I took a brown paper grocery bag and ripped it to fit in my printer,
no scissors necessary.
Then I opened up word super quick, found a font, and typed,
"Welcome to our nest."

Once it was printed I tore the paper down to the size I needed.
I went back to my wreath and hung it on the twine that was already hanging into the center
using just s dot of hot glue.
Then I tore two small piece of the bag and added them for extra strength.

ALL DONE!!!!!

HANG AND ENJOY!!!!!!!!!!!!!
Don't forget to go and enter today's Spring Fling Giveaway contests co-ordinted by Wildflowers and Whimsy

Best project yet, you just keep on outdoing yourself! I have two items that I need to repurpose- hopefully I can get to them soon!
ReplyDeleteso cute and anthro(y)...and I love the pic of you working on it! Thanks for linking up HD friend:)
ReplyDeleteVery cute! And unique!
ReplyDeleteI love this! Thanks for the great tutorial!
ReplyDeleteReally cute! i love the flower!
ReplyDelete-L
Thats cute! Good idea!!!
ReplyDelete"High desert ghettoness".....love it! Where are you in the high desert? I was stationed at Ft. Irwin....lived there (and Barstow) for 5 years :-)
ReplyDeleteLove it! Thanks for sharing in such an easy to understand way.
ReplyDeleteTell Monster he's a great photographer!!
Cheers,
Tracy All Thumbs Crafts
I like this a lot! I saw your link on Whipperberry, visiting from www.icantstopcrafting.blogspot.com, I hope you'll come check my blog out too!
ReplyDeleteway to upcycle an old sweater. it turned out great.
ReplyDeletethanks for linking.
great way to re-use! :) Love the outfit and great photographer! (monster)
ReplyDeletethanks for sharing @ ccc
gail